CSC8502 Greenbulon 7
Video link:Grade: 95%
Summary
For CSC8502, the specification was to create a graphical scene of a planet surface, which transitions to a space scene some way. The module had a variety of tutorial content to teach us the basics of OpenGL and common techniques. The main features of my scene were:
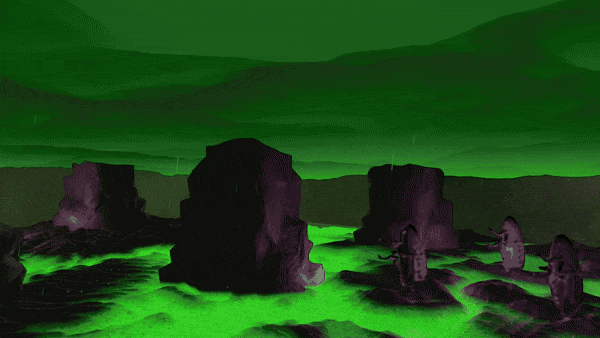
- Deferred rendering with multiple moving lights in the scene. This also supports unlit objects (such as sprites and the skybox) and transparent objects (such as the lake).
- Transparent green water that raises/lowers over time, and uses subtle environment mapping to reflect the skybox.
- Terrain that appears to be lit by the lake, done by a height-based fragment shader. The effect of this is written to a new buffer texture, and is ignored when calculating lighting, such that the effect is seen even when the terrain is unlit.
- Particle systems using GPU instancing for rain and bubbles rising from the lake. These particles use 2D sprites and billboarding to always face the camera.
- Lightning which periodically strikes and illuminates the scene.
- Smooth transition between the two scenes, each using a different scene graph.
- Frustum culling to improve scene efficiently.
- Animated 2D sprites which use spritesheets in the fragment shader to animate over time.
- Animated 3D meshes which animate over time and can be lit by deferred lights.
- A simple material system to easilly change the textures and shaders of scene nodes, and so new scene nodes can easily be added.
- Post processing to introduce screen clouding as the camera approaches the clouds in the surface scene / the planet in the space scene.
- FXAA post processing to smooth jagged edges and to improve visual quality.
- A camera that moves around the scene along a track.
- 60fps+ on the lab pcs.
Extensions of the tutorials
The tutorial content for this module covered a variety of graphical topics, but my main extensions from it were:
Deferred Rendering
Deferred rendering was covered in the tutorials, but not in full: the tutorial was not able to render unlit fragments (such as the skybox, a vital part of the scene) or transparent fragments. I therefore had to do extra work to figure out how to get these to work. For unlit fragments, I noticed that in the first render pass that draws all objects in the scene, the alpha channel of the normal texture is not used. I repurposed this channel to hold whether a fragment should be lit or not. Then, in the shader which combines the diffuse pass and the lighting pass, I sample this value and store it in the isLit variable, and since it is always either 0 or 1, I can multiply my lighting calculations by it to turn them on or off on a per fragment basis.
	fragColour.xyz = diffuse * 0.1 * isLit + diffuse * (1-isLit);
	fragColour.xyz += diffuse * light * isLit;
By multiplying by either isLit or (1-isLit), we can alter how unlit objects are rendered.
For transparent objects, I simply do not render them in the first pass or the lighting pass, and instead render them afterwards. This does however mean that transparent objects cannot be lit or affected by lighting, which is a flaw in my renderer, but I did not have time to research solutions to this issue, and it is not really noticable in my scene as the only transparent object is the water.
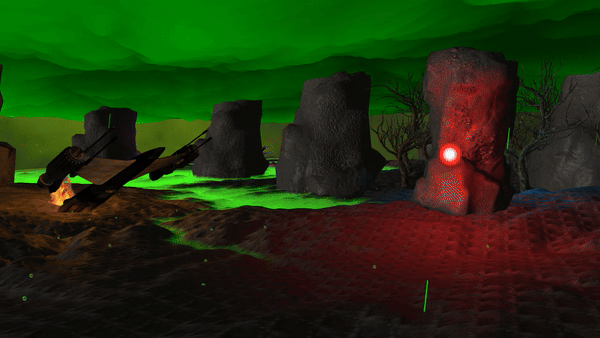
Multiple light sources and working skybox with deferred rendering.
Particle system
Particle systems were not covered in the tutorials, so I decided to find out some ways to implement them. I found this tutorial and followed the implementation, making some changes along the way. For example, I removed some of the fields for the particle struct, as I did not care about the weight and size of the particles for the purpose of my project. I also initially decided to allow for animated particles, storing the current frame of animation the particle was on, but I decided against this due to the time constraints. My particle system uses GPU instancing, so that all particles can be rendered with a single OpenGL draw call. As such, there was very little performance impact, even with a large amount of particles.
Sprite Animation
For the coursework, I wanted a way to render 2D sprites that face the camera. I created a vertex shader which manipulates the model-view matrix to eliminate any rotations, such that the quad is always facing the camera.
	vec3 modelScale = vec3(modelMatrix[0][0],modelMatrix[1][1],modelMatrix[2][2]);
	mat4 newModel = modelMatrix;
	newModel[0][0] = modelScale.x;
	newModel[0][1] = 0.0;
	newModel[0][2] = 0.0;

	newModel[1][0] = 0.0;
	newModel[1][1] = modelScale.y;
	newModel[1][2] = 0.0;

	newModel[2][0] = 0.0;
	newModel[2][1] = 0.0;
	newModel[2][2] = modelScale.z;

	mat4 modelView = viewMatrix * newModel;
	modelView[0][0] = modelScale.x;
	modelView[0][1] = 0.0;
	modelView[0][2] = 0.0;

	modelView[1][0] = 0.0;
	modelView[1][1] = modelScale.y;
	modelView[1][2] = 0.0;

	modelView[2][0] = 0.0;
	modelView[2][1] = 0.0;
	modelView[2][2] = modelScale.z;
	mat4 mvp = projMatrix * modelView;
Shader code, eliminating rotation to enable billboarding.
Animation of the sprites takes place in the fragment shader, where a texture holding the spritesheet is sampled based on the current frame of animation. My animator relies on the spritesheet being laid out horizontally and the sprites of equal dimensions, such that by passing the current frame, number of frames and the dimensions of the image, the correct pixels for that frame can be sampled.
![]()
A fire spritesheet used in the project.
I was very happy with this, as it worked exactly how I invisioned, and I did’t even need any help from online resources.
Extra Shaders
For the project, I created a few of my own shaders, each with specific purpose. One of my shaders uses a new buffer I created, which I called the “glow” buffer. This buffer is rendered to at the same time as the first diffuse pass, but when combining the diffuse and lighting buffers, the glow buffer is not affected by lighting. This allowed me to create “fake” lighting without using lights. For example, my terrain appears to be lit up by the green water of the planet, but this is actually done using the glow buffer, which is filled based on the distance to water.
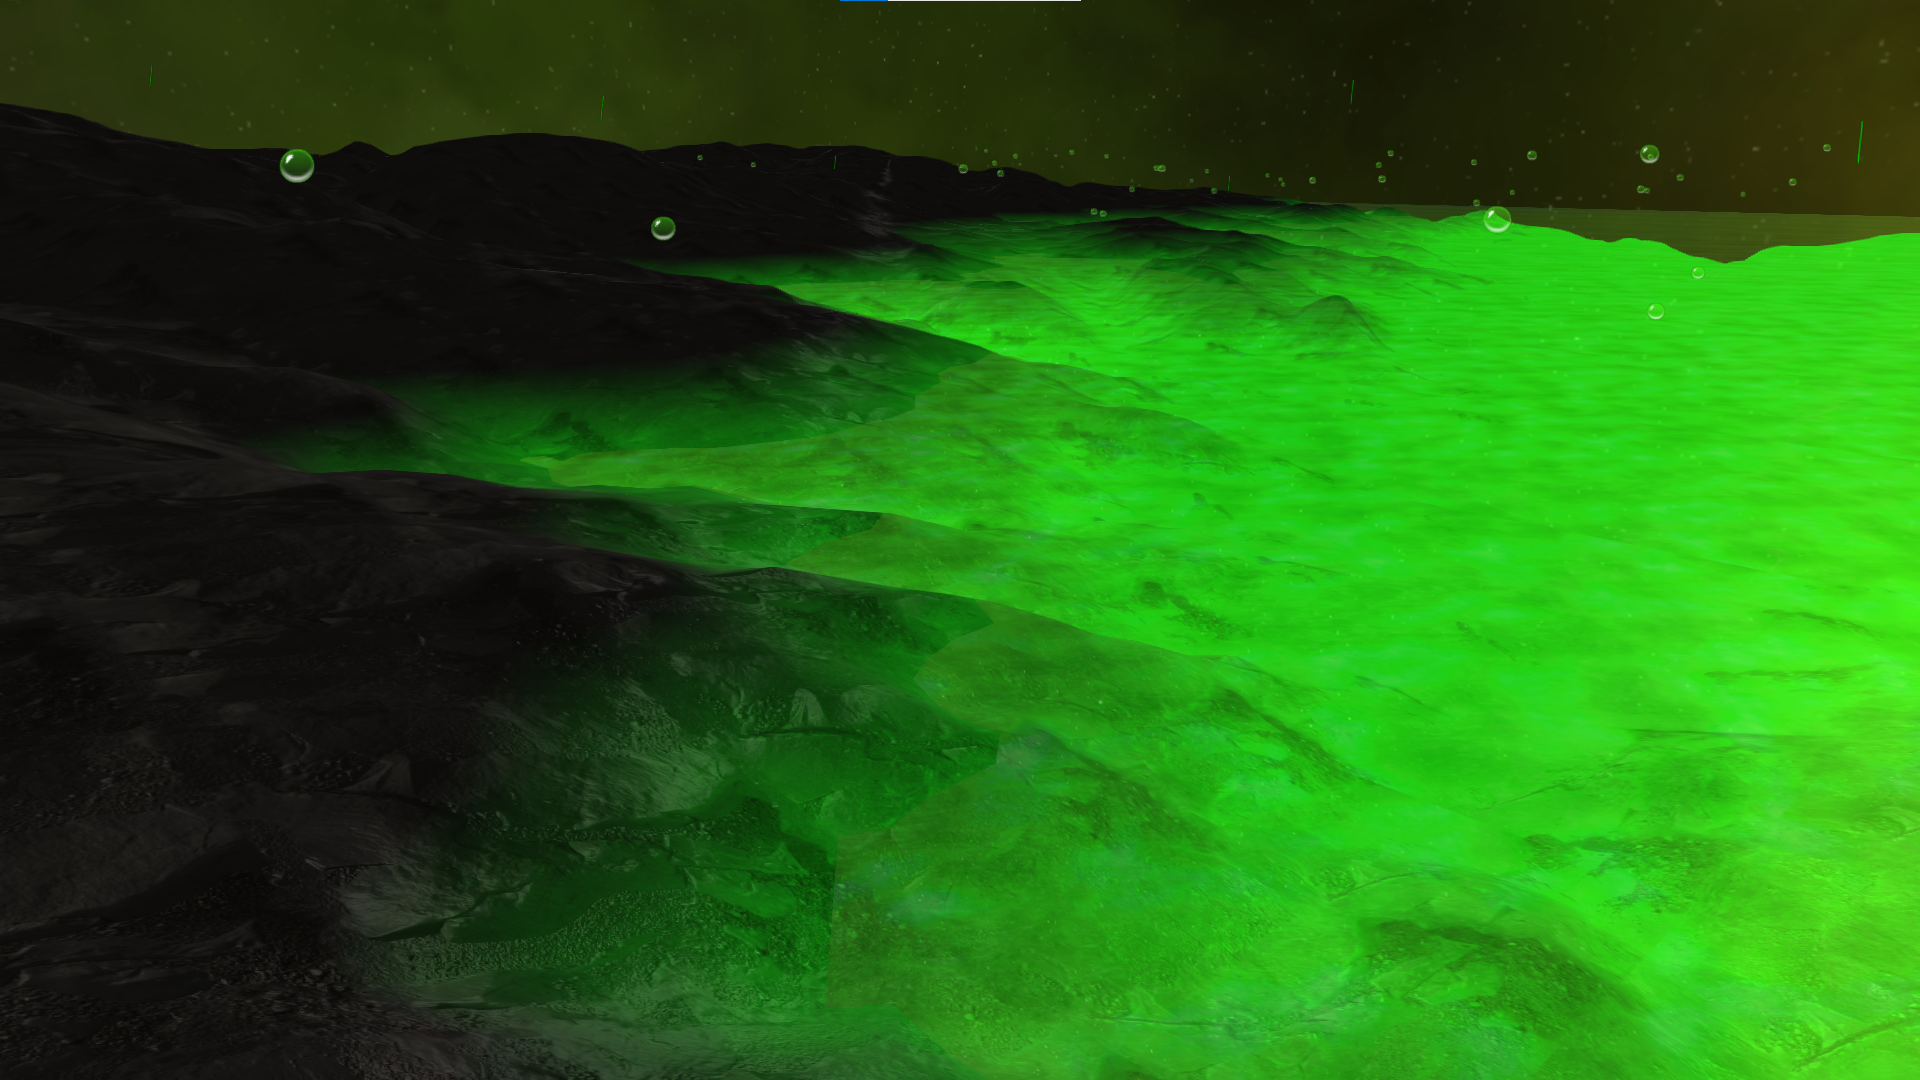
The terrain appears to be lit by the water, but no lighting calculations are done for this effect.
A downside to my approach is that since this effect isn’t real lighting, it does not take into account the normal map of the terrain. Given more time, I think I could have changed this to make the affect more convincing.
Another shader I created was a post-processing shader, which fades the screen to a green colour as the camera enters the clouds. This is done by using the world position of the camera, and fading to green the higher the camera is, until it transitions to the space scene.
Transitioning from planet to space smoothly.
I also created a simple vertex shader to raise and lower the water over time, using sin(time).
What went well
For my first exposure to OpenGL, I think I created a relatively visually cohesive scene. I am pleased with the amount of extra features I managed to add to the project, especially as I created the sprite animation from scratch using my own intuition. I am also glad that the project ran at a good framerate, without any stuttering of frame drops.
I enjoyed writing shaders, and it was cool to know that my code was being executed on the GPU instead of the CPU: before this project, I had never done any GPU programming. I have gained more experience in shaders since this coursework (see my other projects).
What I would improve
My main flaw with the coursework, and the only area in which I think I dropped marks, was my lack of shadow mapping in the scene. This was covered in the tutorial content, which I completed and implemented in a tutorial scene, but did not get around to adding it to my coursework scene. If I had a day or two more, I think I could have achieved this. Additionally, my code overall was slightly messy and could definitely be more readable. In particular, my function for setting up all the objects in the scene is very long, and it would have been better to use a data driven approach where objects were loaded from files instead of explicitly in code.
Code Samples
This is the code used to draw my animated 2D sprites, by passing the number of frames of animation adn the current frame into the shader.
void DrawAnimatedNode(SceneNode* n){
	SceneNode2DAnim* nAnim = (SceneNode2DAnim*)n;
	BindShader(animation2DShader);
	Matrix4 nWorld = n->GetWorldTransform();

	//remove the effect of any parents on the scale component, as we want the sprite to billboard anyway
	nWorld.values[0] = 1.0f;
	nWorld.values[5] = 1.0f;
	nWorld.values[10] = 1.0f;

	modelMatrix =  nWorld * Matrix4::Scale(n->GetModelScale());
	UpdateShaderMatrices();
	GLuint shaderProgram = animation2DShader->GetProgram();
	glActiveTexture(GL_TEXTURE0);
	glBindTexture(GL_TEXTURE_2D, nAnim->GetSpriteSheet());
	glTexParameteri(GL_TEXTURE_2D, GL_TEXTURE_MIN_FILTER, GL_NEAREST);
	glTexParameteri(GL_TEXTURE_2D, GL_TEXTURE_MAG_FILTER, GL_NEAREST);
	glTexParameteri(GL_TEXTURE_2D, GL_TEXTURE_WRAP_S, GL_REPEAT);
	glTexParameteri(GL_TEXTURE_2D, GL_TEXTURE_WRAP_T, GL_REPEAT);
	glUniform1i(glGetUniformLocation(shaderProgram, "diffuseTex"), 0);
	glUniform1i(glGetUniformLocation(shaderProgram, "currentSprite"), nAnim->GetCurrentSprite());
	glUniform1i(glGetUniformLocation(shaderProgram, "numOfSprites"), nAnim->GetNumberOfSprites());
	glUniform4fv(glGetUniformLocation(shaderProgram, "nodeColour"), 1, (float*)&n->GetColour());

	nAnim->Draw(*this);
}
This is the fragment shader that then performs the animation, by calculating where in the sprite sheet the current sprite starts.
#version 330 core
uniform sampler2D diffuseTex;
uniform int currentSprite;
uniform int numOfSprites;

in Vertex{
	vec2 texCoord;
	vec4 colour;
} IN;

out vec4 fragColour[3];

void main(void)	{
	float div = 1.0/numOfSprites;
	vec2 newCoord = vec2(div*currentSprite + div*IN.texCoord.x,(1-IN.texCoord.y));
	fragColour[0] = texture(diffuseTex, newCoord) * IN.colour;
	fragColour[1].a = 0.0; //tells the combine shader that this is unlit
}
When rendering either my space or planet scene, swapping scenes is done by changing the node graph, starting at a different root.
void Renderer::SwapToSpaceScene() {
	currentScene = 1;
	ClearNodeLists();
	camera->SetIsFixed(true);
	SetCameraTrackSpace();
	BuildNodeLists(spaceRoot);
}

void Renderer::SwapToPlanetScene() {
	currentScene = 0;

	ClearNodeLists();
	camera->SetIsFixed(true);
	SetCameraTrackPlanet();
	BuildNodeLists(planetRoot);
}
Since my project used deferred rendering, this was the rendering order I used:
void Renderer::RenderScene() {
	glClear(GL_DEPTH_BUFFER_BIT | GL_COLOR_BUFFER_BIT);
	BuildNodeLists(currentScene==0?planetRoot:spaceRoot);
	SortNodeLists();
	FillBuffers(currentScene);
	DrawPointLights(currentScene);
	CombineBuffers();
	glEnable(GL_BLEND);
	DrawTransparentNodes(); //draw transparent nodes after lighting is performed.
	DrawParticleSystems();
	glDisable(GL_BLEND);
	RunPostProcessing();
	ClearNodeLists();
}
To abstract the rendering away from my game objects slightly, I created a material class to define what shaders and textures an object should use when it is rendered, and if it should be lit.
class Material
{
public:
	Material(Shader* shdr, char* diffuse, char* bump, bool lit);
	~Material();

	Shader* GetShader() { return shader; }
	void SetShader(Shader* s) { shader = s; }

	GLuint GetDiffuse() { return diffuseTexture; }
	void SetDiffuse(GLuint d) { diffuseTexture = d; }

	char* GetDiffusePath() { return diffuseTexturePath; }
	void SetDiffusePath(char* p) { diffuseTexturePath = p; }

	GLuint GetBump() { return bumpTexture; }
	void SetBump(GLuint b) { bumpTexture = b; }

	char* GetBumpPath() { return bumpTexturePath; }
	void SetBumpPath(char* p) { bumpTexturePath = p; }

	bool GetIsLit() { return isLit; }
	void SetIsLit(bool l) { isLit = l; }

	void LoadShaderTextures();
	void BindShaderTextures();

protected:
	Shader* shader;

	bool isLit;

	GLuint diffuseTexture;
	char* diffuseTexturePath;

	GLuint bumpTexture;
	char* bumpTexturePath;
};
Material::Material(Shader* shdr, char* diffuse, char* bump, bool lit) {
	shader = shdr;
	diffuseTexturePath = diffuse;
	bumpTexturePath = bump;
	isLit = lit;
	LoadShaderTextures();
}

Material::~Material() {
	glDeleteTextures(1, &diffuseTexture);
	glDeleteTextures(1, &bumpTexture);
}

void Material::LoadShaderTextures() {
	if(diffuseTexturePath)diffuseTexture = SOIL_load_OGL_texture(diffuseTexturePath, SOIL_LOAD_AUTO, SOIL_CREATE_NEW_ID, SOIL_FLAG_MIPMAPS);
	if(bumpTexturePath)bumpTexture = SOIL_load_OGL_texture(bumpTexturePath, SOIL_LOAD_AUTO, SOIL_CREATE_NEW_ID, SOIL_FLAG_MIPMAPS);
}

void Material::BindShaderTextures() {
	glActiveTexture(GL_TEXTURE0);
	glBindTexture(GL_TEXTURE_2D, diffuseTexture);
	glTexParameteri(GL_TEXTURE_2D, GL_TEXTURE_WRAP_S, GL_REPEAT);
	glTexParameteri(GL_TEXTURE_2D, GL_TEXTURE_WRAP_T, GL_REPEAT);
	//glBindTexture(GL_TEXTURE_2D, 0);

	glActiveTexture(GL_TEXTURE1);
	glBindTexture(GL_TEXTURE_2D, bumpTexture);
	glTexParameteri(GL_TEXTURE_2D, GL_TEXTURE_WRAP_S, GL_REPEAT);
	glTexParameteri(GL_TEXTURE_2D, GL_TEXTURE_WRAP_T, GL_REPEAT);
	//glBindTexture(GL_TEXTURE_2D, 0);
}
This is the shader used to make the terrain look like it is glowing. The glow colour is stored in fragColour[2].
#version 330 core

uniform sampler2D diffuseTex;
uniform sampler2D bumpTex;
uniform bool isLit;
uniform float maxGlowHeight;
uniform float glowRange;

in Vertex{
	vec4 colour;
	vec2 texCoord;
	vec3 normal;
	vec3 tangent;
	vec3 binormal;
	vec3 worldPos;
} IN;

out vec4 fragColour[3];

void main(void)	{
	mat3 TBN = mat3(normalize(IN.tangent), normalize(IN.binormal), normalize(IN.normal));

	vec3 bumpNormal = texture2D(bumpTex, IN.texCoord).rgb * 2.0 - 1.0;
	bumpNormal = normalize(TBN * normalize(bumpNormal));

	fragColour[0] = texture2D(diffuseTex, IN.texCoord) * IN.colour;
	fragColour[1] = vec4(bumpNormal.xyz * 0.5 + 0.5, 1.0);
	fragColour[1].a = isLit?1.0:0.0;

	vec3 GREEN = vec3(0,1,0);

	fragColour[2].rgb = fragColour[0].rbg * GREEN * max(((maxGlowHeight-IN.worldPos.y)/glowRange),0);

	fragColour[2].a = 1.0;
}